Showing posts with label Techniques. Show all posts

Monday, February 6

Notes from a Busy Household

I must have started half a dozen posts in the last month and a half. Not a one of them made it far enough along to bother with the bright orange "Publish" button that mocks me from the top of the page.

Life moves so fast sometimes. Do you suppose I've seen that Matthew Broderick Super Bowl commercial too many times? It's one of the few I really liked. As I watched most of them, I felt like I must be outside the targeted demographic because of my age. Or my gender. Or maybe my species.

It seems like I've hardly had a moment to myself since before Christmas, with the exception of a few that were very carefully carved out under heavy guard. Extra special thanks go to Adam for helping carve and guard! I'm sure I'd have gone completely round the bend without them, rather than just most of the way, holding on for dear life.

So what have I been busy doing, you ask? Well, I put 17 items on my Big To-Do list last month. As of this morning, 11 of them are done.

For the last several weeks, I've been:
  • Finishing mittens for Ian, just in time for the weather to get all warmish again. On the plus side, they're adorable, even if all they're doing right now is dangling from the sleeves of his coat. I did make notes while I was working on it, so I'm going to try making a pair for Rosi as well and actually writing up the pattern before the end of winter. (Mental note: update list)
  • Writing out three grocery lists and bought enough food to keep us all fed.
  • Doing our taxes and submitted them online. Hooray for Free File at irs.gov!
  • Developing a lesson plan on the history of Jane Goodall's Roots & Shoots program
  • Writing a scientifically accurate story of how a snowflake grows and practiced making snow paint out of various ingredients. (For the record, I thought the shaving cream version had the best effect given the cost and effort involved in making the paint.)
  • Updating my resume. Again. I think I've finally got it the way I want it now.
  • Revising my professional profile. If you're not familiar with the term, that's a one-page overview of my career history, skills and qualifications, and what I'm looking for in a new job situation. It's sort of like a mini-resume, but is specifically designed for networking purposes.
  • Becoming a member of a new church. Well, the church isn't that new, but we've only been going there for about 6 months. It's nice to have a church home again, but it's really not helping at all with the being-less-busy thing. It's a good busy, I know, but sometimes I just want a day off or three. (Another mental note: Don't forget to send that e-mail about the VBS planning meeting next week)
  • Figuring out where to donate a batch of recycled heart crayons so that the next project we're doing with the Roots & Shoots group will actually be useful to some kids other than ours. We're donating them to the local Ronald McDonald House.
Add to that all the normal everyday stuff like cooking and cleaning and making sure the kids bathe regularly, learn some new stuff, and don't kill one another. Or their father. Or me.

And, hey, what's going on with my blog design? I didn't authorize a blue stripe down the middle of my sidebar! Now I'm going to have to mess with that again (attempting to make yet another mental note).

***ERROR: THERE IS INSUFFICIENT SYSTEM MEMORY AVAILABLE IN RESOURCE POOL 'MIND' TO COMPLETE ACTION.***

Oh, dear.

Tuesday, December 6

Finally, It Makes Sense

Ever since I first discovered it, some five years ago, I've thought the Tunisian crochet stitch was pretty cool. Both of my long-time readers may remember this Tunisian stitch satchel I made for my niece, lo these many moons ago.

More recently, I found instructions for the Tunisian Knit stitch in a stitch dictionary I'd gotten. The resulting fabric is such a neat knit-like look, without all the trouble of actually having to knit. The only problem was, the instructions provided in that particular book were not very clear. I tried and tried and tried, but just couldn't figure out quite where to place my hook to get the neat chained-stitch effect.

Tunisian Knit StitchThis week's Crochet Me newsletter features a tutorial on the Tunisian stitch, including a diagram of Tunisian Knit showing exactly where the hook goes. I tried it out and, whaddaya know, it worked exactly like it's supposed to!

I can totally see this as a cuff to a sweater or a mitten. Maybe I'll start a pair of mittens for myself, now that the winter weather has actually arrived in Sioux Falls with a half inch of snow dusting the ground. Or maybe I should complete some of the UFOs cluttering up the top of my piano first ...

Tuesday, August 25

My Very First Sweater

You may remember my asking for suggestions about what to make first for the baby. I decided on a sweater. I found a pattern that looked really interesting, where the sweater is actually crocheted in two pieces, both hexagons. Since I dislike finishing my work (that is, having to do more stuff after the crocheting is done), it seemed like a good idea. Only, I found it boring to work on. The entire sweater is made up of double crochets. I mostly completed a test version that is now clothing my daughter's teddy bear. I decided not to work one up for the baby.

On a whim the other day, I picked up The Big Book of Weekend Crochet at the library. Although most of the patterns didn't really appeal to me, I love the sweater shown on the front cover. Unfortunately (or, perhaps, providentially) the pattern didn't include a newborn size. So I made up my own. I altered the pattern stitch a bit to better fit the yarn I had available and I made my very own baby Fisherman's Sweater.

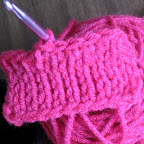
Sadly, with our camera still busted, I couldn't take a photograph of it. This poor-quality substitute will have to do (it's what happened when I put the sweater into my scanner). The orange bow is not meant to stay, but is keeping the shoulder flap together until I get around to sewing the buttons in place. That will be sometime after I find my button stash, or I break down and buy some more. While I wish I had a better photo to share with you, at least this does show off the stitch pattern pretty well. You'll have to use your imagination for the rest of it. You can click on the image to see a bigger version.

EDITED TO ADD: You can see the finished sweater with buttons here.

Of course, I didn't write down all the changes I was making to the pattern as I went along. Sorry about that. I can share the adapted stitch pattern I used, though.

Ch 18
Row 1 (wrong side): Sc in second ch from hook, dc in next ch, *slst in next ch, dc in next ch. Repeat from * 6 times. Sc in final ch. Ch 1 and turn.
Row 2 (right side): Sc in each st across. Ch 1 and turn.
Row 3: Sc in first sc, slst in next sc, *dc in next sc, slst in next sc. Repeat from * 6 times. Sc in final sc. Ch 1 and turn.
Row 4: Repeat Row 2.
Row 5: Sc in first sc, dc in next sc, *slst in next sc, dc in next sc. Repeat from * 6 times. Sc in final sc. Ch 1 and turn.

Repeat rows 2-5 until piece reaches the length you desire.

Now that I have finished the baby's sweater, my daughter has been begging for one of her own. I have a feeling hers will take a little longer than two days to complete. She's a bit bigger now than she was as a newborn.

Thursday, August 20

Climbing Out of Debt

As I have alluded in previous posts, Adam and I accumulated quite a bit of consumer debt while he was out of work for a year and a half. We are finally poised to actually start paying some of it off, rather than just making minimum payments to each account.

Being the analytical person I am, I wasn't content to simply follow a single strategy because some financial expert or another recommends it. I need to do things the hard way and find out for myself why they work (or don't). I'm beginning to realize just now how challenging that single trait must have been to my parents, since my daughter is exactly the same way, but that's a post for another day.

In any case, I had two basic theories to test. I have read debt-repayment plans that suggest paying off credit cards and loans based on both the interest rate (paying off high-rate loans and working your way down to lower-rate ones) and debt size (eliminating the smallest debts first so you can increase payments to your larger loans more quickly). For some, these may be the same--their lowest interest loans may be the largest. Unfortunately, that isn't the case for us.

So, I spent an hour or so gathering up all my interest rates and minimum payment numbers, then entered everything in a spreadsheet for comparison. Calculating both the interest-based repayment and debt-size repayment options, I discovered something which surprised me. While the interest-based strategy does pay off slightly faster, the total repayment difference between the them was just two months out of a five-year plan or about 3% over the life of the loans.

Depending on how your own debt is organized, you might find some differences in the exact numbers, but I honestly have to say that either repayment plan is a good one. Using the high-interest strategy, you may save a few dollars, but if your debt is poorly arranged (like ours), you end up paying off multiple lenders for a much longer time. By paying off the smaller debts first, you can eliminate several debts more quickly, which has a great motivational effect, but it may end up costing a little more money overall.

For those of you who may enjoy long division in your spare time, but would like to see how these numbers actually work for your own debts, let me share the formula I used to figure out how long it would take to repay each loan.

The amount you owe
+ The finance charge (APR ÷ 12 x the amount you owe)
- Your monthly payment

That will tell you your new balance due after one month. Repeat the same formula for the second month, but make sure you change the amount you owe to indicate the new monthly balance.

When working with multiple debts, remember when one is paid off, you then adjust the monthly payment to your next highest interest rate (or smallest balance due) to include the additional payment amount available from the debt that has been eliminated.

Friday, July 24

Perfect Hard-boiled Eggs

Hard-boiled eggs are a wonderful food. Easily portable, high in protein, and good on their own or as part of a larger dish. I've even eaten hard-boiled eggs on pizza (and it was pretty good).

Unfortunately, when the eggs are hard to peel, this yummy, easy food becomes an absolute pain in the neck.

There is, however, a right way to boil eggs. Who knew?
  1. Arrange eggs in pan so they are not touching.
  2. Cover with cold water.
  3. Bring to a boil over high heat.
  4. Reduce heat to medium and simmer for 15 minutes.
  5. Remove eggs from pan and place in a bowl filled with ice water.
  6. Refrigerate for 10 minutes.
  7. Remove from water, dry, and peel or store.
Using this method, even my 4 year old can easily peel her own eggs without losing most of the eggwhite with the shell.

Happy boiling!

Saturday, April 11

Knitting with a Crochet Hook

File this under things I never knew were possible. Apparently there is a company called Amazing Yarns that makes crochet hooks with a small hole in the end through which you thread some string which allows you to crochet, knit, and tat all with the same tool.

After seeing some examples of the knitted projects, I had to try it out. Well, okay, I mocked up a homemade version because you know I couldn't wait for them to ship one from California. It really works. Stockinette, garter, knitting in the round--this is so cool! I have got to add these to my wish list.

I wonder if I could make cables. Hmmm ... must go play more.

Sunday, March 22

Socks

I have this theory that I can crochet socks. It's probably inspired by a book I got for my birthday, aptly named You Can Crochet Socks. Except, darned if I can't (no pun intended).

I've started at least three of the patterns, but either I'm reading them wrong or they weren't written very well in the first place because I have yet to turn out an actual wearable sock, much less a pair of them. Meanwhile, my feet have been cold all winter.

Maybe I should just suck it up and try knitting again. Knitting just seems so much less forgiving than crochet. If I make an error while I'm crocheting, I'll just rip out a row or two and fix my mistake. Knitting doesn't work that way, though. I have been reading about this technique where you knit two socks at once ... that could be useful.

Anybody else go from crochet to knitting? Any tips?

______________________________________________________________


Don't forget to enter my giveaway for this crocheted purse!
______________________________________________________________

Saturday, February 21

Wonder Drugs

Attention boys and those of you for whom frank discussion of bodily functions is distasteful: this post is not for you. Save yourself the trouble and just go now. I promise I'll have something else for you to read another day, but you really won't appreciate this one.

Are they gone? Okay, good. Now we can talk about cramps. Period cramps, I mean. The yucky, nasty, I-just-want-to-curl-up-on-the-bed-in-the-fetal-position-and-whine kind of cramps. I've got them ... or rather, I had them this morning. Then I took a couple of Excedrin. Et voilà I'm feeling so much better. And you thought Excedrin was just for headaches!

Actually, I did, too. Then I took this trip to New Zealand. Funny story, really. I was visiting my friend from high school who'd moved there with her family. For some reason, international travel always brings my period early. I don't know why, but I understand it's pretty common.

Of course, while I was visiting for 10 days, my period showed up. I'd had some light cramps in the morning, but nothing bad, so we heading off for our day excursion. There we were, visiting some little touristy village or another, and I found myself suddenly having trouble walking because the pain was so intense. Not wanting to cut our day short, we stopped in at a gift shop to take a look at their selection of pain relievers. I didn't know any of them and my friend only recognized one brand. We asked the clerk which would be the best. She asked what the trouble was. I explained and she decisively set one package on the counter. "You want this one," she told me. "It's the strongest."

The box was labeled Panadol. My friend shrugged, and we paid for the pain reliever and a bottle of water. I took two tablets. Within about 20 minutes, the pain was completely gone. I was ecstatic. We spent the rest of the day walking and wandering and having a blast. I took the box home with me and used the pills with care, trying to make them last.

Several months later, a woman at work was complaining about PMS and nasty cramps. I told her about my miracle medication from New Zealand. I said I'd never seen it here, but it worked wonders. The box listed paracetamol as the active ingredient, but I didn't know what that was. I also mentioned my sadness at the fact that my stash was just about gone. My coworker looked up paracetamol on the internet and came back to tell me it was just another name for acetaminophen. All this time, I'd been hoarding the Kiwi version of Excedrin!

The next time "Aunt Flo" came to visit, and pretty well every time since, I was all stocked up. I don't always get horrible cramps, but when I do, I'm ready. And as an added bonus, Excedrin works great headaches, too.

Sunday, February 8

Saturday, January 17

Car Seat Safety

If you are involved in a car accident while your child's car seat is installed in the vehicle, you may need to replace the seat--even if it was not in use at the time of the accident. I didn't know that until a couple of weeks ago. Just yesterday, I discovered that broken glass in the seat is a cause for replacement as well, even if you've vacuumed it up. In most cases, your car insurance will cover the cost of purchasing the same or similar make and model seat.

Minor accidents may not require a replacement seat, if ALL of the following conditions are met:
  • The vehicle was able to be driven away from the crash site
  • The vehicle door nearest the safety seat was undamaged
  • There were no injuries to any of the vehicle occupants
  • The air bags (if present) did not deploy
  • There is no visible damage to the safety seat
  • (source National Highway Traffic Safety Administration)
I found all of this out because our daughter was starting to outgrow her seat. Again. I told Adam when we installed that car seat, it was probably the last one we'd have to buy, since the weight limit went up to 80 lbs. Unfortunately, our daughter has quite a long torso, so while she's no where near the weight limit, she was getting to tall for the harness straps.

We didn't have a spare $100+ to get her a new seat, so I was checking out some online resources to see if she would really be safe in just a booster seat (the short answer? no). While I was reading up on boosters, though, I found out about the replacement guidelines.

Adam had been involved in a car accident a few months ago, so we went to see our insurance agent whether a new seat would be covered under our policy. As it turns out, the accident fit into the "minor" category described above. However, we did have the back window of our car broken over the summer, with much of the glass falling into the car seat. When we had the window replaced, the technician vacuumed out the seat and we didn't think anything of it. Turns out we should have replaced the seat then.

So, yesterday afternoon was spent car seat shopping. We were able to find a seat that fits much better--and has room to grow. On Monday, we're taking our old seat in to the insurance agents' for disposal. It feels good to be safe!

Saturday, December 20

The Name Game

Yesterday was rotten. I got bad news about work from two clients and an e-mail with bad news from a bank we owe lots of money (they want more). Since I really don't want to dwell on either of these issues, I'm writing about something else entirely: Names and how to choose them.

I had a philosophy of naming for quite some time before I ever conceived a child. Because my given name is simply Amy, rather than Amelia like the great-grandmother after whom I was named, I always wanted a long, classic name that had more nickname options. I decided my kids would have nice long names. Three of them, in fact.

My three-name system included one name each based on
  • family tradition
  • the Bible
  • our own desires
None of the names should be after living relatives, with the possible exception of a "Junior" named for his dad. I didn't particularly want a Junior in the family, but I was willing to give my then-unknown husband rights to one son named for himself, if it was really important to him.

I determined that none of the names would be invented. Before I was married, my middle name was a hyphenated compound of my father's name and my grandmother's name. It was unusual and always looked funny to me--to this day, I can't remember if the second half of the name is supposed to be capitalized or not. In any case, I didn't want my poor child to be saddled with an invented name such as mine, which I'm sure sounded hip and groovin' in 1975, but by the early eighties, I was an odd duck in my grade-school classroom full of _____ Janes, _____ Maries, and _____ Elizabeths.

Any names up for consideration were required to have a strong positive meaning, not spell strange words with initials, and not sound like anything obscene or hurtful. Official naming could not take place until after birth, as I wanted to meet my child before bestowing a name upon him or her. Once Adam and I got married, I added another caveat: No names that start with "A"! I really didn't want to be that family.

When I was pregnant with my daughter, we'd chosen a name to call the baby in utero. We hadn't specifically declared that we would incorporate that name into her given name, but I didn't want to rule out the possibility either.

Really, when I think about it, it's a wonder we managed to find any names at all!

At my behest, we took the scientific approach. Adam and I each went through the name-your-baby book individually. We collected all the names we really liked and noted their origin and meaning. Because no names from the country of Adam's birth were included in our book, we added a few of those to his list as well. Once we'd completed the collection phase, we traded lists. Each of us had the opportunity to veto names that we wouldn't consider because of personal connotations. Then the real fun began.

I put all the names into a priority comparison tool and printed out two copies, one for Adam and another for me. We spent a day or two (or twelve) comparing each name to identify our personal top 10. By the time I went into labor, we had narrowed our list of girls' names to just 18 (from which we needed to choose three). We still had 60-some boys names because I never did finish the prioritizing exercise with those; Adam had given up and just circled ten he liked. I actually brought the folder to the hospital with us so I would have it for reference, in case we had a boy.

In the end, we did give our daughter three names. One of them is a family name, one is appropriate to the nickname we used in utero. One is just for fun. Her initials don't spell anything scary. The worst problem we've had is that her first name is quite unfamiliar to Americans and almost no one pronounces it correctly.

Since I'm not telling you my daughter's name, let me share the three most popular names in the US for the year she was born (2005): Emily, Emma, Madison.

The most popular names for 1975? Jennifer, Amy, Heather. In fact, Amy has been in the top 200 most popular names in the US since 1951.

1973 (the year Adam was born)? Michael, Christopher, Jason.

Want to know the top names from your birth year? Check out the Social Security Website. They have lists of the 1,000 most popular baby names each year since 1880, when the top names were John, William, James (for boys) and Mary, Anna, Emma (for girls).

Friday, December 12

Recycled Giftwrap

This year, as I was thinking about what it takes to make a frugal, green Christmas, It occurred to me that I could combine recycling, crafting, and gifting!

If you're looking for money saving holiday tips, you can find a whole bunch over at Keeping the Kingdom First. There is a contest for the most creative frugal idea, with a $500 gift card to Wal-Mart as the prize. Head on over to the contest page and check it out!
click photos for larger images      

Materials
  • 25 plastic grocery bags made into plarn (plarnmaking instructions from My Recycled Bags.com), using only the solid color portion of the bag (if you want to use both the solid and printed sections of the bags, you'll only need about 15)
  • A few yards of contrasting scrap yarn or plarn for embellishment (optional)
  • 2 contrasting plastic bags for wrapping (I used bags from Barnes & Noble and Target for green and red)
  • Handles from approximately 10 bags and one bottom seam for bow
  • Size H (5.00 mm) crochet hook
Instructions

Box

Note: most rounds are worked continuously, do not join rounds with a slst unless indicated.

  1. Ch 2; 4 sc in 2nd ch from hook.
  2. 2 sc in ea sc around. (8 sts)
  3. 2 sc in ea sc around. (16 sts)
  4. 2 sc in 1st sc, *1 sc in next sc, 2 sc in next sc* repeat 6 times, 1 sc in last sc. (24 sts)
  5. 1 sc in 1st sc, *2 sc in next sc, 1 sc in ea next 2 sc* repeat 6 times, 2 sc in next sc, 1 sc in last sc. (32 sts)
  6. 2 sc in 1st sc, *1 sc in ea next 3 sc, 2 sc in next sc* repeat 6 times, 1 sc in ea last 3 sc, join with slst. (40 sts)
  7. Ch 1, sc in ea sc around, join with slst.
  8. Turn to ws; slst in ea sc around.
  9. Turn to rs; sc in ea slst around.
  10. Sc in ea sc around. Repeat for next 6 rows, join with slst at end of last row.
  11. Ch 1, sc in ea sc around, join with slst.
  12. Tie off and weave in ends.
  13. Embellish as desired.
Lid

Note: most rounds are worked continuously, do not join rounds with a slst unless indicated.
  1. Ch 2; 4 sc in 2nd ch from hook.
  2. 2 sc in ea sc around. (8 sts)
  3. 2 sc in ea sc around. (16 sts)
  4. 2 sc in 1st sc, *1 sc in next sc, 2 sc in next sc* repeat 6 times, 1 sc in last sc. (24 sts)
  5. 1 sc in 1st sc, *2 sc in next sc, 1 sc in ea next 2 sc* repeat 6 times, 2 sc in next sc, 1 sc in last sc. (32 sts)
  6. 2 sc in 1st sc, *1 sc in ea next 3 sc, 2 sc in next sc* repeat 6 times, 1 sc in ea last 3 sc. (40 sts)
  7. Sc in ea sc around, join with slst.
  8. Ch 1, sc in first 10 sc, *2 sc in next sc, sc in next 9 sc* repeat 2 times, join with slst. (43 sts)
  9. Turn to ws; slst in ea sc around.
  10. Turn to rs; sc in ea slst around.
  11. Sc in ea sc around.
  12. Sc in ea sc around, join with slst at end of last row.
  13. Ch 1, sc in ea sc around, join with slst.
  14. Tie off and weave in ends.
  15. Embellish as desired.
Wrapping

Cut handles, ends, and writing off contrasting colored bags. Use one to line box and protect gift. Wrap another around the outside of the box and secure with tape, as you would wrapping paper.


Bow
  1. Flatten creases out of the handles of about 10 bags; the more handles you use, the fuller your bow will be.
  2. Stack handles together, folded at seams (the very top of the bag).
  3. Squeeze centers together and tie tightly with the bottom seam of one bag; do not trim ends of tie.
  4. Trim off top seams and bottom edges of handles to within 2" of center tie.
  5. Make ½"- to 1"-deep cuts across trimmed edges to fringe.
  6. Spread out layers into a pleasing pouf.
  7. Attach to wrapped gift using ends of tie.

Sunday, November 16

New and Improved Children

Now even more uses!

Do you bake your own bread?

Have you been eyeing those newfangled stand mixers with dough hooks or so-called "bread machines" all with the prices to match?

Are you the mom or dad of a young child? Do they like play dough?

If so, you already have all the "bread machine" you need!

Rather than spending your hard earned money on machines that make bread for you, then spending even more money on dough for your children to play with--include your kids in the bread making game, and let them do the kneading for you!

Public Service Announcement brought to you by your friends at Experience Imagination.

Tuesday, November 11

Under Pressure

If you are considering buying or using a pressure cooker (and if you don't already own one, you really should consider it), there are a few things you ought to know.
  1. You'll need one about twice the size of whatever you might want to cook
  2. Want to make a gallon of chili? You'll need an 8-quart cooker. Because the cooking method requires pressure to build up within the covered pan, you can't fill it to the top.
  3. Only fill your pan halfway
  4. Repeat after me, "Only fill it halfway up." If you fill it too full, the steam valve will get clogged, the pressure won't build properly, and you'll end up with a pot full of burnt, half-cooked chili. Ask me how I know this.
  5. When working properly, the cooker hisses, spits steam, and the weighted cover on the steam valve rocks back and forth
  6. The first time you use it, you may think it's going to explode. It won't. If the steam valve is getting louder and the valve cover stops rocking, turn down the heat a little bit.
  7. Make sure you add enough water to produce steam pressure
  8. This may result in a slight thinning of some recipes. To counteract that, after the pressure has dissipated, uncover your pan and drain or boil off excess water.
  9. You can't open the lid before releasing the pressure
  10. Most (all?) cookers on the market today have a quick-release button. Take care when using it, however, as steam will come shooting out of the pot and can cause injury. Do not use this pressure release method with soups and stews, as superheated liquid may escape with the steam.
  11. Do not try to cook pasta or fry foods under pressure
  12. Oil does not produce steam and if heated to a high enough temperature, will catch fire. Pasta needs time to rehydrate and adding pressure does not speed up the process.
Pressure Cooking The Easy WayIf you're trying pressure cooking for the first time, I would recommend using a recipe designed specifically for use with a pressure cooker, like the one below. If you decide to make pressure cooking a regular habit, I'd suggest investing in a pressure-cooking cookbook. We have a couple different ones (also owned by Adam for more than five years); I've found Pressure Cooking The Easy Way to be most helpful.

And now for the best part, my 25-minute bean recipe!

Refried Beans in the Pressure Cooker

2 c dried pinto beans
2 T salt
2½ qt water, divided
2 T oil
2 large onions, diced
6 cloves garlic, minced (approx. 2 T)
2 T chili powder
2 T cumin
  1. Add dried beans, salt, and 1½ qt water to cooker
  2. Bring pressure up over high heat, reduce heat and cook under pressure 5 minutes
  3. Let pressure reduce and drain beans and set aside
  4. Sauté onions and garlic over medium heat until soft (do this in the bottom of the pressure cooker)
  5. Add spices, remaining water, and beans
  6. Return to high pressure and cook 15 minutes
  7. Let pressure reduce and mash beans with a potato masher or the back of a fork
Nutrition Facts
Serving Size 1 c (334 g)
Serving per Recipe 6
Amount per Serving
Calories 235 Calories from Fat 50

% DV
Total Fat 5.5g
Saturated Fat 1g
Monounsaturated Fat 3.5g
Polyunsaturated Fat 1g
Cholesterol 0mg
Sodium 287mg
Total Carbohydrates 37g
Dietary Fiber 11.5g
Sugars 3g
Protein 11g
9%
4%


0%
12%
12%
46%

Monday, November 10

How Did I Not Know About This??

I'm a convert, folks. Hook, line, and pressure cooker. Yup. I just finished making refried beans. It took me 25 minutes, from dried beans!

Can I tell you how many times I've decided against some recipe because I didn't have canned beans in the house? Think what this will do to my hummus making! Easy peasy.

Seriously, why didn't anybody tell me about this? Adam brought a pressure cooker into the marriage. That means I've had access to this wonderful time-saving miracle gadget for four-and-a-half years, yet I'm just now discovering it.

*hangs head in shame*

I need to go eat lunch now, but I'll be back later with a recipe and some pressure cooking tips. Actually, better make that tomorrow. Let's be realistic here, I saved lots of cooking time, but the thing doesn't do dishes or mop the floor.

Hmmm ... an automatic pressure floor mop ...

Sunday, November 9

Wa-hoo!

Well, I needed something to cheer about since the Bears lost. Again.

Happily, I found it. I was able to change the properties of my template to fix the problem I was having with numbered lists.

Whenever I had a numbered list, it would look like this:
    1. Item One
    2. Item Two
    3. Item Three
    4. And so forth ...
But, I discovered a neat little bit of code that I could change and make my problem disappear (no pun intended).

I went into the HTML for my template and replaced
    .post ul {
    padding-left: 32px;
    list-style-type: none;
    line-height: 1.4em;
    }

    .post li {
    padding: 0 0 4px 17px;
    background: url(the url of my image) no-repeat 0 3px;
with
    .post ul {
    padding-left: 32px;
    list-style-image: url('the url of my image');
    line-height: 1.4em;
    }

    .post li {
    padding: 0 0 4px 17px;
    }
And now, when I choose to use an ordered list, I see this:
  1. Thing one
  2. Thing two
  3. Thing three
Isn't that so much nicer?

Friday, October 31

Ducky Slippers

I made these as part of my daughter's Halloween costume last year. You'll notice in the pictures that there is a white "sole" on the slippers. That's not part of the pattern. The day before Halloween it was raining, so I quickly top stitched some plarn onto the bottom to help keep the slippers dry. You can find instructions for making plarn at My Recycled Bags.com.
click photos for larger images      
Materials used
• 5 oz Yellow Red Heart Supersaver yarn
• I crochet hook (5.5 mm)

Gauge (with two strands of yarn)
5 sc = 2 inches
8 sc rows = 3 inches

Finished size
4½" wide (at toes)
7½" long
7" tall

Special stitches
backstitch single crochet (bsc): holding yarn to the front of work, slip hook into stitch from the back, yo and pull loop through to back, yo and pull through both loops on the hook
single crochet 2 together (sc2tog): slip hook into first stitch, yo and pull loop through stitch onto hook, repeat once, yo and pull through all loops on hook
single crochet 3 together (sc3tog): slip hook into first stitch, yo and pull loop through stitch onto hook, repeat twice, yo and pull through all loops on hook

NOTE: Pattern is crocheted with two strands held together throughout

foundation row: ch 16, sc in 2nd lp on underside of ch, sc across (15 sts)
round 1: [ch1 sc3tog, *sc, 3sc in one st, sc, sc3tog* twice] repeat along second side of foundation row, do not join
round 2: sc in ea sc around, do not join
round 3: *sc2tog, sc to end of side (13 sts)* twice, do not join
round 4: *sc2tog, sc to end of side (12 sts)* twice, do not join
rounds 5-7: sc around (24 sts), do not join
row 8: sc to center of top (approx. 6 sts), turn (no turning ch), bsc around (24 sts)
row 9: turn, sc around (24 sts)
row 10: turn, bsc around (24 sts)
row 11: turn, sc 11, sc2tog, sc to end of row (23 sts)
row 12: turn, bsc 10, backst2tog, bsc to end of row (22 sts)
row 13: turn, sc 9, sc2tog, sc to end of row (21 sts)
row 14: turn, bsc 8, sc2tog, bsc to end of row (20 sts)
row 15: turn, sc 7, sc2tog, sc to end of row (19 sts)
row 16: turn, bcs 6, sc2tog, bsc to end of row (18 sts)
row 17: turn, sc 5, sc2tog, sc to end of row (17 sts)
row 18: turn, bsc 4, sc2tog, bsc to end of row (16 sts)
row 19: turn, sc 3, sc2tog, sc to end of row (15 sts)
row 20: turn, bsc 2 sc2tog, bsc to end of row (14 sts)
row 21: turn, sc 7 (to center of row), fold in half and slst heel on wrong side of fabric.
round 22: return to right side of fabric, ch 1, sc around, do not join (24 sts)
rounds 23-31: sc around (24 sts)
round 32: sc 24, join w/slst
Tie off and weave in ends.

Wednesday, June 25

Keeping Food Fresher Longer

This post originally appeared on By Hook or By Cook.

I have a tendency to purchase in bulk, thinking it will be a better deal. Unfortunately, when the bulk of my purchase spoils, all I've ended up doing is making expensive garbage. Here are a few ideas I've picked up along the way to help my food last longer.

  • Cheese: wrap loosely in waxed paper and cover with foil before placing it in the fridge
  • Butter: freeze butter in its original box inside a plastic bag
  • Greens: wrap gently in a paper towel inside a plastic bag or line a hard-sided container with paper towels
  • Fresh Herbs: cut ¼" off then end of the stems and set them in a cup of cool water as you would fresh flowers
  • Meat: divide larger packages of meat into your usual meal sizes and freeze in sandwich- or quart-sized zipper bags inside one- or two- gallon zipper bags
  • Ice Cream & Popsicles: keep frozen treats toward the back of the freezer, away from the warm drafts of an open freezer door
Find more tips and ideas at Rocks in My Dryer.

Tuesday, February 5

World Nutella Day


This post originally appeared on By Hook or By Cook.

If you've never tried Nutella, you positively must. Celebrate World Nutella Day, try it today!

It's made by Ferrero, the same folks that brought us Ferrero Rocher, the tastiest chocolate candy on the market (in this blogger's humble opinion).

I was first introduced to Nutella after my sister had spent a summer in Germany, back in the early 80's. We had it on toasted bagels for breakfast. The whole family was sad when our jars ran out, because we couldn't yet find it here in the states. Thankfully, the Ferrero people got their act together and expanded their distribution, so it's now pretty widely available throughout the US. To find a shop near you that carries Nutella, visit their Store Locator.

One of my favorite dishes made with Nutella is chocolate blintzes. I can't give you a full recipe, because I mostly made it up on the spur of the moment one morning and didn't write it down. However, if you want to play for yourself, mix Nutella (maybe half a jar?) with cream cheese (I'd guess about 6-8 oz), and beat it with a fork until it starts to get a little fluffy. Fill and roll the crepes, bake them as per any standard cheese blintz recipe. As I recall, we served them with sliced strawberries. Ummy-yummy!

Tuesday, January 22

Allergies and Substitutions

This post originally appeared on By Hook or By Cook.

I can't remember just now if I've blogged about it before (and I'm too lazy to look it up), but both my daughter and I are allergic to cow's milk. Over the years, I've found a number of pretty decent substitutions that I can just throw in a recipe measure for measure.

Milk
My basic go-to milk is Silk® Soymilk. I've tried just about every commercial soy brand out there and this one comes the closest to the taste of cow's milk. Even my dairy-loving husband agrees.

For cooking, Silk works great as well. I've also tried both Almond and Hazelnut Non-Dairy Beverages from Pacific® Natural Foods. They are nice if you're looking to add a bit of nuttiness, such as in a quick bread recipe. I found that I tasted them a bit more than the Silk, though in sauces and other milk-based items.

One of the few items I'd still really like to find a good source for, but haven't yet, is dry milk powder. I haven't looked too hard for it yet, since it's not something I use that much, but I'd love to be able to make a hot cocoa mix, for example, that I could just add water to and drink on these cold winter days!

Yogurt
My daughter's favorite is Silk LiveTM Soy Yogurt. I like the price, as it's usually the cheapest of the soys, but the taste, especially plain and vanilla, are a little off for me. I prefer WholeSoy & Co.® Soy Yogurt for myself. Unfortunately, it generally costs half again as much, so I'm as likely to eat the Silk as not.

Redwood Hill Farm Goat Milk Yogurt is tasty, but extremely cost prohibitive. It usually costs about twice as much as Silk. I save this for special treats.

I have tried making my own yogurt with Silk, but I can't really see that it's worth the effort on a regular basis. Maybe if we had a yogurt maker ...

Cheese
I get most of my cheeses at Trader Joe's. They tend to have the best prices for goat and sheep cheeses. Here are some of my favorites (and how I use them).
  • Basque Shepherd's Cheese (sheep's milk)--this is a nice semi-soft cheese. I use it like cheddar or mozzarella, though it is quite a bit tangier than the latter. My favorite uses for this cheese are baked pasta dishes, pizza, and Pears and Cheese.
  • Pecorino Romano (sheep's milk)--this is a hard cheese, wonderful for grating. I substitute this whenever Parmesan is called for in a recipe. The taste is slightly tangier and saltier, but there is little enough difference that when I serve it to others, they don't comment on the flavor.
  • Manchego (sheep's milk)--the absolute best on wheat crackers! I'm guessing it's classified as a hard cheese, though it's not as hard as Pecorino Romano. This cheese stands well on it's own, as a cracker topping, with fruit, or in sandwiches. I'm not sure I've had any success melting it, though. Correction: Manchego melts beautifully. I just had it in an omelet a few weeks ago and it was fabulous.
  • Chèvre, also called Goat Cheese (goat's milk)--I use this soft cheese in place of cream cheese. It is slightly tangier and a little stiffer (sometimes I thin it slightly with milk) but generally it holds up to anything from cheesecake to bagels to blintzes. I also use this for stuffed pasta dishes, such as manicotti or lasagna. It is definitely tangier than ricotta, but if you're using a spicy tomato sauce, the difference is negligible. I rarely use fresh goat cheese as a crumbled topping to salads, but it works well for that, too.
  • Goat Cheddar (goat's milk)--I've been going back and forth on this one. Depending on the shopping trip, I seem to get nice mild cheddar or very strong goat-y cheddar, even within the same brand. The first is yummy, and a perfect substitute for cow's milk cheddar. Unfortunately, the second is a bit overpowering. I'm not sure what makes the difference.
  • There is only one vegetable-based cheese I've tried that I can recommend: Tofutti® Better than Cream Cheese. I don't like it as well as Chèvre, but for a bean product, it does pretty well. I had the best luck using it for the baked pasta dishes. As with goat cheese, it is a bit tangier than cream cheese, but not dramatically so. If you like tofu and it is a regular part of your diet, you probably would have no problem using the Tofutti on bagels or anywhere else you might otherwise use cream cheese. I found it a bit too strongly flavored of bean for those purposes.
Cream, Butter, Half-and-half
Because I have problems with the whey (protein), I am able to eat real whipping cream and butter made from cow's milk, since they don't contain enough protein to cause me problems. I have learned, however, that there are several brands of cream that are called "heavy" but contain milk proteins. It's just a matter of learning to read labels with care.

Generally, when a recipe calls for half-and-half, I simply substitute half whipping cream, half soymilk.

I have also evaporated my own milk to use in place of half-and-half (see below).

Evaporated Milk, Sweetened Condensed Milk
For evaporated milk, I generally just use cream, cup for cup, or make my own, starting with 2½ times the amount of evaporated milk called for and boiling it down. I wouldn't recommend evaporating soymilk for sweet recipes, however, as the soy flavor becomes concentrated as it evaporates. One of the nut milks or perhaps an oat milk would work better for most desserts.

Sweetened condensed milk could probably be made the same way, just add sugar (1½ times the amount milk called for in the recipe) while you're evaporating. I've never tried this through. If you have, please let me know you're results. I have substituted coconut milk in a few recipes, but my success has been somewhat varied.